Saturday, February 4, 2012

Memory Board 101

           I just love memory boards. They are such a great way to show off your memories of favorite places or people without taking up alot of room. I made my 1st one just a few months ago for my Grandma to have in her nursing home room and she just loved it! I have made many more since then and keep getting asked how to do it so I figured it was time to show the world just how easy they are to make!


           Here's what you need to get started:

  • Quilt Batting, you can get in a package like this at Walmart or you can go to a fabric store and buy it by the yard. This is a Poly-Blend but you can use any kind of batting you'd like.
  • 1 stretched artists canvas in what ever size you'd like. I find a 16x20 makes a great sized board and you can find these at Walmart or if you are near a Michael's, they run them on sale alot for 40% to 50% off.
  • Staple Gun and staples. I highly recommend you get one like the one pictured, The Easy Shot! They are fabulous! Your hand doesn't feel like its going to break after a few staples with this type gun. Check your local hardware store.
  • Fabric of your choice, however much you need to cover the canvas. I use about 2 inches more on all 4 sides than the size canvas I am using. (ex. 16x20 canvas = 18x22 piece of fabric)
  • Ribbon to go with your fabric and some buttons as well.
  • Not pictured are some hem tape, Heat-n-Bond iron on adhesive ( 5/8 to 3/4 inch size, ultrahold strength is best) and 3/4 white ribbon.

The first thing you want to do is cut your fabric to the size you need. Remember at least 2 inches extra on each side.


Lay your fabric wrong side up on your work surface and add batting on top. Take your canvas and place it upside down on the batting.


Now comes the fun part, STAPLING!!! (Yeah, I need to get more, I know.)  Making sure you have your canvas centered on your fabric/batting, take your staple gun and staple the center of one side, pulling the fabric tight.


Be sure to staple once in the center of the 1st side then turn and staple the opposite side, then repeat with the remaining sides. You should have 1 staple in the middle of each side at this point. You need to start this way to make sure you get the fabric stretched across the canvas good and tight.

From here you start on one side and staple the fabric down along the edges to about 1/2 inch or so from the corners. Take a small hammer and tap the staples in when you finish each side. Remember to work opposite sides!


This is how your board should look at this point in the process:


The corners are pretty easy to do once you get the knack. 1st you straighten out one side of the corner like the picture below:


Next you fold the corner downward towards the other side. Then lay it back over and staple it flat. Add extra staples if you need, be sure to hammer them too!


Once you have all 4 corners done, trim away the extra fabric.


Your memory board should look like this:


Now you will take you coordinating ribbon and stretch it out across the front of your board at an angle, leaving a little over hang on the loose end of the ribbon. Flip the board back over and staple one corner down.


Repeat this step again to form a an X on the front of the board.


Continue on with your ribbon until your board looks like mine!


Now we will move on to how I finish the back. You don't have to do this step but I didn't like the way the back looked with all those staples so I figured this easy way to dress it up! Take your white (or whatever color, really doesn't matter) ribbon that is about 1"inch wide and your hem tape (HeatnBond) and cut both to fit one side of your memory board.

Place the hem tape on the board and lay the ribbon on top so it covers the iron-on adhesive. Using a hot iron, gently press down on one end of the ribbon for about 5 to 10 seconds, move down the length of the ribbon. This will fuse the ribbon to the rough edge of the fabric and the wood on the back of the board. Do remaining 3 sides and you will have a nice clean looking back to your board!


At this point you can sew on some buttons if you'd like or you can glue them on. I sew mine on because it gives the board a quilted look. You do not have to even put buttons on it if you don't want to, just a personal preference of mine!
Well there  you have it folks, really neat memory boards that take no time to make! Finished product looks great, I think!


Friday, February 3, 2012

How I Made A Magnetic Make-up Board!

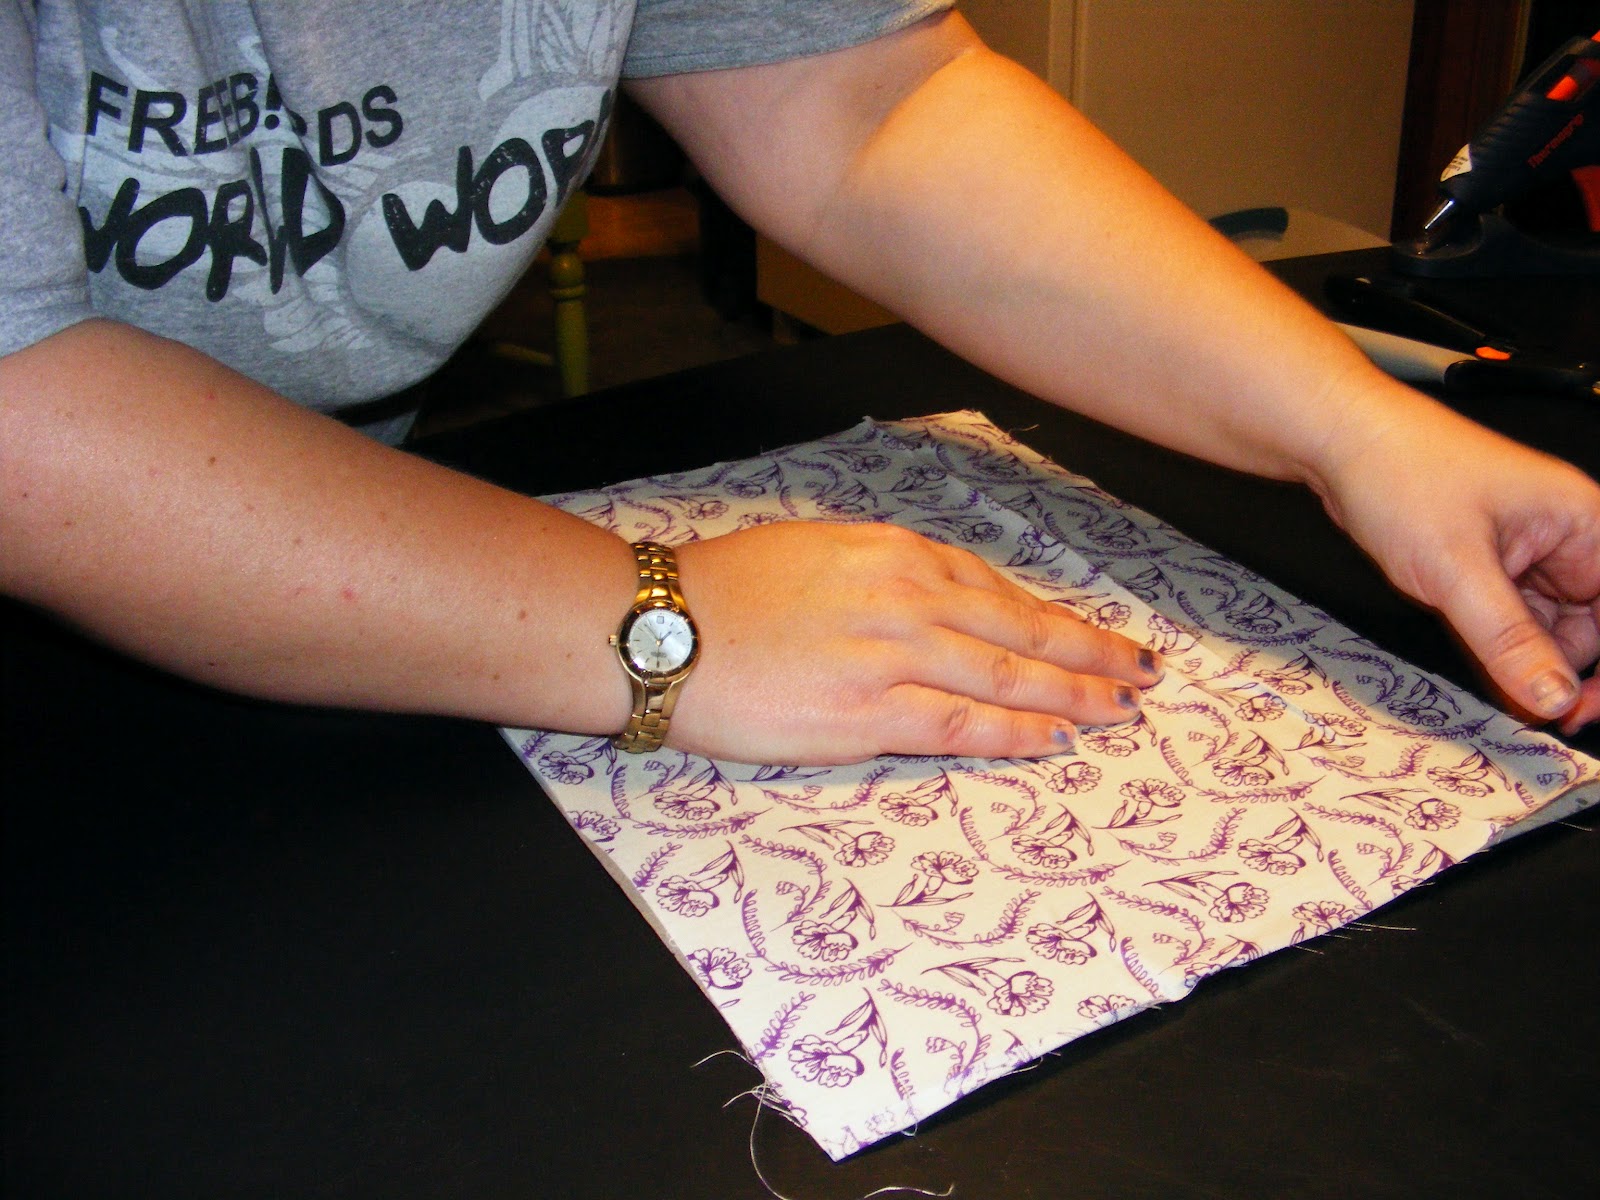
    I saw this idea and thought once again, "Hey I can do that!"....so I did. What I did not do was my nails before I started taking these picture! Ignore the half worn off polish okay? LOL!

    That being said, here is a step by step guide to making this magnetic makeup board. You can make it however big or small you need. (I used 10x13 frames.)

Things you will need to complete this little project:
  • Old picture frame, spray painted whatever color you'd like
  • Piece of metal cut to fit inside of frame. I used galvanized flashing my father in law had laying around but you can get some at a local hardware store. You can use any metal that magnets will stick to.
  • Spray adhesive
  • Piece of fabric to cover the metal. I use fat quarters from Walmart ($.97/each.) They are cheap and you can find all kinds of pretty stuff!
  • Small button sized magnets (craft section at Walmart)
  • Hot glue gun and glue
  • Makeup
  • Small container for makeup brushes and eyeliners and such. I lucked out and found the ones I used at the Dollar Tree. They come in red, blue, green and purple and they are in the school supplies isle as magnetic pencil cups! You can make your own out of large pill bottles from the pharmacy painted to match.


Here is a picture of everything I used


So the first thing you want to do is cut your fabric to be slightly larger than the metal.


Next, spray your metal with the adhesive. Be careful when spraying because this stuff will go everywhere!


Quickly stretch your fabric over the sprayed metal and smooth out all the wrinkles and bubbles. You have a few minutes with the brand of spray I used but too much lifting and repositioning will make you have to start over with the spray.


You are ready to put your fabric covered metal into your painted frame at this point. Be sure to trim any extra fabric off for a nice clean look on the back. You can take clear caulk and run around the back of the frame for some added stability if you want but if you frame has lots of tabs to hold it you will be fine.


Gather your makeup, some button magnets, and a hot glue gun for this next step. On the back of your makeup, hot glue 1 magnet for the small ones and 2 for larger compacts. Hot glue is great because once the makeup is used up, you just pop the magnet off and glue it on your new container!


I ran into one issue with one of the girls eye shadows. The container was not solid on the back so I had to fill in the gap so the magnet would reach the board. I used old buttons I and glued them in the hole 1st, then added the magnet. You can always just double stack the magnets if you need to. I have 4 of these to make so I was trying to conserve my magnets!


It is at this point I would like say that I think after Caller Id, the cordless glue gun is the best invention of all time! Okay well maybe not of all time but certainly to a crafty person like myself! I highly recommend you invest in one!


I add some extra magnet strips to my container just for a some security. If you make your own, obvious you will want to. You can get magnet strips at Walmart in the craft section too.


And there you have it, a pretty magnetic makeup board of your very own! This one is my youngest daughters, the bottom one belongs to my 2nd to oldest girl!


Monday, January 9, 2012

The Bacon Bomb

Ok so I saw this made in a video on Youtube and thought, "hey, I can make that!'...so I did! Here is a step by step picture recipe of how to make the insanely pork-laiden Bacon Bomb! You might want to check your cholestoral levels after eating this!


Step 1: Gather ingredients.

There are really only 4 ingredients to this recipe.

2 pounds of fresh ground pork*
1 package of thick sliced bacon
1 bottle of bbq sauce
1 container of your favorite rib rub

*if your local store does not normally sell fresh ground pork, ask them to make you some. Most will and it is usually cheaper than ground beef. I got mine done for $1.99/lb!


Next you will take your ground pork and place it on a cutting board or flat clean surface. I recomend you genrously sprinkle the area with the pork rub before placing the meat down. This will make it easier to flip the slab and lets just all agree to call it a slab of meat because it is! Pat the meat into a rectangle and start rubbing the rib rub into the meat. Do not spare the rub here people..its alot of meat and it need alot of rub!


Flip meat over (use a large spatula to help flip it if needed) and run more spices onto the other side.
In a small skillet, take 2 or 3 pieces of the bacon and fry them until they are crispy. Cut them into small pieces and spread over the spiced meat. I like to cut my bacon up before I cook it, it just seems to cook fast that way to me. You could also cheat a little on this step and use already made real bacon bits from the store.


Once you get that done, you want to start rolling this like a jelly roll.


Now it's time to get started on the bacon lattice work that will go over the top of this yummy pork roll!

Take your thick cut bacon and lay out 5 pieces, just barely touching lengthwise. Place on piece in the center of the 5 pieces like you see below. (I didnt have great bacon but you get the idea!)
I jumped ahead a little here in my pictures (got excited about making lattice out of bacon!) so I will walk you through the next set of pics and you just do the same thing for both sides of the center slice of bacon shown above.

Starting with the outside piece of bacon, fold up the 2nd and 4th pieces of bacon over the center piece. Lay down 1 new piece of bacon across the remaining 3 pieces still laying down.

Fold 2nd and 4th pieces down over bacon. Next you flip up the 1st, 3rd & 5th pieces of bacon and layer in another new piece of bacon. Fold down the flipped up pieces and continue with another piece of bacon, possibly 2 depending on how long your original 5 pieces are. You will be left with a bacon latticwork that is pretty awesome in its own right!


At this point you need to place your pork roll on the lattice work and start to roll it up tightly in the bacon.


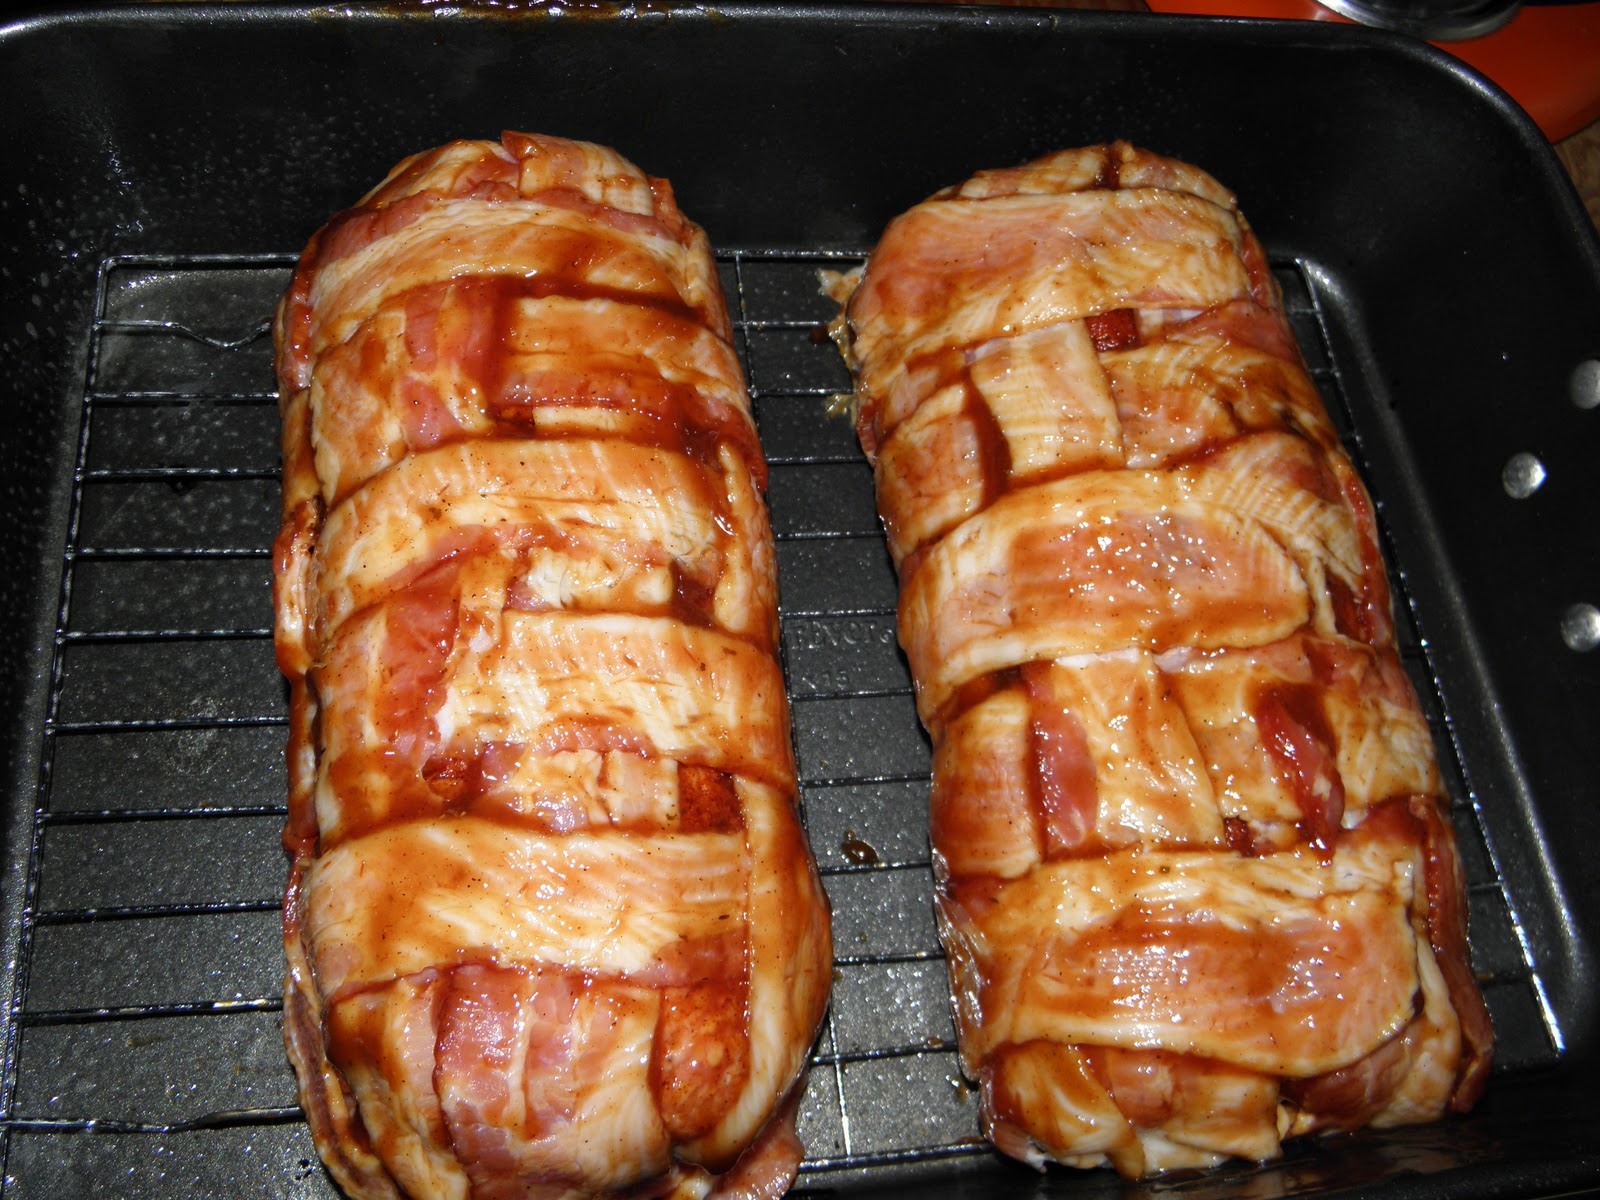
At this point you will pour some of the bbq sauce into a bowl and brush it on the Bacon Bomb. 


I made 2 Bacon Bombs to accomidate my ravenous Herd of teenagers so what you see in the above pic is the recipe x2!

You will want to place a baking rack of some kind in the bottom of whatever pan you bake this in or else it will get mushy on bottom. Bake this at 425 degrees for 1hour and 15 minutes. Yes, this seems like a long time at such a high temp but remember you are cooking a really thick meat slab covered in thick bacon!
Every 20 minutes, and this is VERY IMPORTANT, you need to take your bbq sauce and baste this dish...EVERY 20 MINUTES for the entire time it is in the oven!!!  This will help it stay moist as the inside cooks to perfection!

Use a meat therometer and stick in the middle of the slab ( I just love that word! lol) and as long as your center internal temp is 160 you should be fine if it looks like it is done before the given time. (160 degrees is the recommended cooking temp for ground pork) Slice this bad boy into even slices and have at it!!!

I do not have pics of this done but I will update tomorrow night with pics! I went ahead and made this up tonight so that the pork rub would have extra time to season the meat! Let me know if you try this and what your families think of it!


Sunday, December 11, 2011

So its been exactly 1 year......

Forgive me Blogger for I have failed....it's been 1 year since my last blog.

Has it really been a year? WOW, where has it gone? 365 days, 12 months, 52 weeks. Yeah you get the picture! What can I say? Its been crazy.

A year of ups and downs, some highs and even more lows but life goes on anyway. Going to try and get back into this. Somedays, you may not like what I have to say but I owe it to myself to be honest, even if its not pretty.

Still have 5 wonderful kids and a devoted husband whom I still get all school girl giddy over so not much has changed in that area of my life, just been a busy year here in Andersville.

Try and keep up if you like, I'd love some feed back even if I make you mad or make your day!

More to come,


Sandy

Thursday, November 17, 2011

Stationery card

Tidings We Bring Christmas Card
Find unique and Personalized Christmas cards at Shutterfly.com.
View the entire collection of cards.

Saturday, December 11, 2010

This Will Be Our Best Christmas Ever

This has been one of the worst years on record for our little (yeah I said little! LOL!) family, BUT it could have been so much worse than it was.

 It has been a year of major financial hardships. Who ever said money isn't important has obviously never had to sacrifice to buy shoes or milk for their kids! We recognize that God is in total control of our lives and He will always see us through whatever trouble comes our way, whether its how are we going to pay yet another $350.00 light bill or how are we going to afford the car repairs? We have nearly lost our collective shirts this year but every time we think we have reached as far down as we can go, God has made a way for us. He is so faithful that way! He has indeed been good to the Anders Herd this year, well every year to tell the truth!

It has been a year of major personal heartaches for us as well. We have had to say good-bye to dear friends who seemed too young to go. We have said good bye to loved ones who, while we know they were ready to meet their Savior, we weren't ready to let them go. We have endured the loss of relationships with people we tried so hard to love but because they lack Christ in their lives, cannot see the damage they have done and have chosen to live in ways we cannot be apart of.  We have held our children as they cried over the actions of others, tried to sooth their wounded hearts and remind them to pray for those that hurt them. We have leaned on each other because we know if one of us tires in the daily struggles, the others can hold them up. And through it all God has blessed our family time and time again.

We hope that we are raising our children to have servants hearts and that they know the real meaning of Christmas isn't presents you get because you are "good". We want them to always hold Christ in their hearts, so that they can share God's gift to the world with others. Christ is the best present you can ever give your child. Nothing else could ever compare with His love and sacrifice.

While part of me as a mother is sad that Christmas morning my kids will open a few small gifts, I have this strange peace that tells me this will be the Christmas the kids will remember as the best. You see, this year our entire family will celebrate as Christians! What more can a parent give their child than to lead them to a personal relationship with Christ? I am just so filled with love when I think that all my children are now Christians and truly love the Lord! I am so looking forward to spending the day with my husband and children.

We have so much to be thankful for this Christmas! We may not have designer sheets on our queen size bed, but we have a roof over our head and gas in the tank of the cars! We have more than enough food to eat and some to share! We have a church that cares about us and family that loves us.

We have a God who sent His ONLY Son to die in our place on that Cross....what more does anyone person REALLY need?


Merry Christmas Everyone, We love you!

Monday, October 18, 2010

Stop The World, I Want To Get Off.............

This past week has been a difficult one for our family.  To say it was crazy would be a gross understatement. I don't even know where to start to tell everything that went wrong. We did have a great day Thursday but it was short lived. Good days never seem to last long enough do they? I don't think so. If we could have a ratio of 1 to 1 on good and bad days, life would be alot less stressful don't ya' think? Instead we seem to have a ratio of 100 to 1 with bad days taking the lead!

I know things will be better and that it will all work out but sometimes I just want to cry. This last week has seen the death of  my Aunt in Arkansas, the news that my precious dog Zoe is dying and there is nothing we can do to stop it, MAJOR lack of money for all we needed to do just to survive the week, car trouble not once, not twice, not three times but four (on both vehicles!), being sick as a dog for both Wes and I, all while trying to shuffle kids to various places, feed the cow twice a day, do the housework, homeschooling 2 kids, get 2 people ready for a weekend long camp out and run errands everyday, of course that is in between car trouble! Its no wonder I forgot to pack Tucker's dinner for the Friday night of the camp out. Still feel like crap about that.

Contrary to popular belief, I am not Super Mom. I never have been, I never will be. I know this. I am not fast than a speeding cat after he has been scared to death by a preteen boy. I am not more powerful than the DMV who makes you wait hours only to be told you are missing something they never told you needed! I am not able to leap tall laundry hampers, that never seem to empty, in a single bound! NO WORLD, I AM NOT SUPER MOM!

I sure could use a visit from Super Mom right about now, but I am sure she is off fixing her kids an organic lunch while mine eat fish sticks and tater tots!


It just seems like we can never catch a break. I know we have been blessed and I try so hard to hold on to that when everything goes haywire. Its just so hard.  Every time we just about get our head above water someone shoves us back under.  It's getting harder to stay positive when all we seem to get is trouble, no matter how right we do things. We follow the rules and get penalized.  I wish I were exaggerating when I say it has been YEARS of this but sadly I'm not. Years, people.....not days or weeks.....YEARS! You just have no idea how tiresome of this constant, never ending string of trouble has become.

Just having a bad time right now.